Rega Tonearm Upgrades2023-05-30T10:04:39+01:00

Rega Tonearm Upgrade Modifications by Origin Live

Rega Modifications

Add to Cart and configure options

“With its superior bearing arrangement and no tracking force spring to add resonance’s, it’s a true giant killer. It has all the dynamic power and seismic bass of a £2000 super arm but costs a fraction to buy. With Origin Live’s rewiring, it’s one of the best arms money can buy and no less a bargain.

I have to say the Rega upgrades turn this humble arm into a real Giant killer. Gone is the rather grey, sterile sound of the cooking Rega. Instead, tonal colour is fresh dynamics have great speed and impact, and the sound stage is huge.” Read More >
Hi-Fi World

“The overall musical and sonic performance of the Origin Live RB250 is simply astounding. Considering its sub-$500 price, the only appropriate reaction is to yell, “Eureka!”” Read More >
Stereo Times

“I had the arm tube and extension modification done years ago by OL and it took my rb300 from pleasant sounding to superb. Rewiring is another big step but whatever else you decide to do, get the new counterweight and structural mod.
OL’s turntable motor and power supply is another game changer and highly recommended.” Owner Comments >
Owner Comment

All Rega Tonearm Reviews

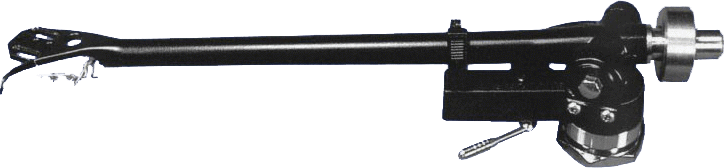
Rega Tonearm Modification applies to almost ALL Rega arms

The Structural Modification can not be fitted to the RB101.

Any Rega tonearm can be transformed by Origin Live’s upgrades. Many reviewers in the past have used a Rega tonearm modified by Origin Live as their reference tonearm in preference to pick up arms costing over 6 times as much. This unique Rega Tonearm modification upgrades arms in such a way that every aspect of performance benefits. The results have surprised and delighted users. Rega owners still ask us if their particular vintage or model of Rega tonearm can be modified and the answer is always yes with the exception of their very first arm – the RB200.

Rega Tonearm Counterweight and Rear stub Modification £94

Upgrading the rear stub and counterweight of the Rega tonearm, massively upgrades performance.

As the cartridge stylus negotiates its tortuous way through your record grooves it sends shock-waves down the arm tube. What happens to these shock-waves normally? Some of the energy is transmitted down into the deck, but much of it meets the Rega counterweight structure and is reflected back down the Rega arm tube to the cartridge–highly detrimental for good sound quality.

There is a secondary reason why the rear end of Rega tonearms is an extremely critical area–the Rega counterweight represents by far the highest mass in the arm and affects the Rega tonearm performance significantly. The Rega counterweight is excited into resonance by the motion of the arm. This means it should be decoupled and yet also remain rigid to the tonearm. The beauty of the Origin Live Rega tonearm modification is that it acts as a shock absorber for waves traveling down the arm from the cartridge, and also acts to de-couple the Rega counterweight whilst maintaining rigidity.

What The Rega Tonearm Upgrade Involves

The Rega tonearm upgrade involves removing the rear stub. This stub is easily unscrewed from the Rega arm. Origin Live replace the old Rega stub with a new stub (or you can do it yourself). The new stub is torqued onto the arm by a thin high tensile bolt. The new stub is also designed such that it presents a low contact area onto the Rega arm tube and is therefore decoupled, yet far more rigid than the original. This change also allows the new counterweight to be rigidly clamped onto the new stub using an Allen bolt. The Origin Live Rega modification elevates a Rega tonearm into the same league as super arms.

If your Rega arm was manufactured after 2019 then you cannot fit the stub modification yourself as Rega has started glueing in their stubs from around this date. In these cases, send your arm to Origin Live and we will carry out the modification but only for metal rear stubs (silver colour).

Rewiring

Internal Rewiring (£107) replaces the jointed wire inside the arm with continuous very high grade Litz wire. The benefits of rewiring Rega arms are well documented and the effects are clearly audible in greater transparency and definition.

External Rewiring (£92) replaces the external arm cable from where it exits at the arm base. We use a high performance cable for this purpose specially selected out of hundreds of tests. Some think that any good interconnect will achieve an upgrade but this is a huge mistake as the signal strength can be over 1000 times lower than that for which interconnects are designed for.

Please note that although you can order just the internal rewire without the external we do not offer just the external rewire without the internal. This is because the Rega internal wires are extremely fragile and easily damaged.

Packing Your Arm to Send to Us

Once you have placed your order online you can send the arm to us. The arm travels well in a box with scrunched up newspaper or bubble wrap. Remove the counterweight and wrap separately. Lastly, ensure that the finger lift on the end of the arm tube is well protected as this is the most vulnerable part and can get snapped off unless precautions are taken.

Remember to enclose your contact details with the arm so that we can marry it up with your online order. Once we receive your arm we can normally dispatch it within 2 to 4 days.

Please do not send your cartridge to us with your arm. It is extremely likely for the cartridge to be severely damaged during transit. It is not needed for the upgrade.

Performance Comparison of Upgrades

To give an idea of the significance of each Rega upgrade, a percentage ranking has been assigned to each modification to represent the performance enhancement.

Structural Mod and counterweight 60%
Internal rewire 20%
External rewire 20%

Each of these modifications can be carried out by Origin Live, in which case you will need to send your arm into us and we will carry out the modification. We realize that you don’t want to be without your arm for long and so turnaround is usually within 1 to 3 days.

Please note that although you can order just the internal rewire without the external we do not offer just the external rewire without the internal. This is because the Rega internal wires are extremely fragile and easily damaged.

Rega Tonearm Warranty

When we upgrade a Rega tonearm, the Rega warranty becomes invalid and is replaced by our own 2 Year Warranty. If you choose to fit the kit version of the modifications yourself, then we only guarantee against defective parts that we’ve supplied. Rega invalidate their warranty if their products are modified in any way. This is to be expected as all manufacturers operate on this principle for obvious reasons.

Rega Tonearm Modification FAQs

Rega Tonearms from other Brands – What is the difference?2017-12-14T11:35:40+00:00

What are the differences between the “badged” RB250, RB251 and RB300, RB301 arms (such as Moth, Michell etc. RB250 or RB300 arms) and the versions that Rega supplies?

There is no difference between an rb250 and rb300 arm supplied by Rega and their “badged” OEM equivalents supplied by Rega to other manufacturers such as NAD, Moth, Michell, Audio Note, Basis etc. Rega simply supply their standard arms to other manufacturers who then have their own badges placed on the arm. In all other respects the arms are identical. There is the occasional exception to this rule, in that some manufacturers prefer the Rega bearings not to be glued in as this enables removal and repair in the case of the vertical base bearings. Variations of this nature make little or no difference to the performance of the Rega tonearms.

Warranty

A badged tonearm manufactured by Rega, has no Rega warranty as Rega specify that the arm is now the duty of the OEM brand to support. In other words the warranty on any badged Rega arm is up to the supplier of the arm.

Rega Tonearm Model Differences2017-12-14T11:33:26+00:00

What are the physical differences between the rega rb250, rb300, rb600 and rb900?

Rega Rear end stub:

The most significant difference between the arms is that the RB300, RB600 & RB900 have a stainless steel stub at the rear end where the rega counterweight is mounted. The rear rega stub on the RB250 is plastic. This difference alone explains the RB250’s inferiority to the RB300 RB600 and RB900. Once modified this difference is removed and the modded RB250 is superior to the RB300, RB600 and RB900.

Rega Counterweight:

The counterweight on the Rega RB300 RB600 and RB900 is either tungsten or stainless steel. The rega counterweight on the Rega RB250 and RB251 is black in colour and made from steel..

Rega Tonearm Bearings:

The rega tonearm bearings in the RB300 and upper arms have a higher grade ABEC specification. The bearings are also graded for tighter dimensional tolerance as the arms increase in price.

Tracking force adjustment:

The Rega RB300 RB600 and RB900 have a spring dial system to set tracking force. On the Rega RB250 and RB251 tracking force is adjusted by rotating the counterweight. Once modified you will need a stylus balance to set the tracking weight on the RB250.

The spring mechanism is removed by some audiophiles as it is found to introduce resonance and the arms sound better without it. We do not recommend this course of action as it devalues the resale value of your Rega tonearm and the Rega spring cannot be replaced once it is removed.

Rega tonearm base:

The mounting body of the Rega RB300 is made of stainless steel, whereas the mounting body of the rega RB250 is made of brass. The arm base on the rb900 is very different and is held by 3 bolts which has a better decoupling effect than the standard arm.

The latest generation of arms all use the 3 point mounting system on the base. The lower arms use plastic to form the base but upper arms use metal. The change from threaded bases was not popular in many quarters as it makes adjusting the vta laborious. The old Rega threaded bases can be fitted with threaded vta adjusters which gives them infinite adjustment.

It is difficult to say what prompted Rega to change from the threaded base to the 3 point mounting. Some think it was a cost issue and moulded plastic is easier but it is also likely that there was a performance gain for some people. In our view the perceived performance increase was observed because most Rega tonearms with threaded bases are tightened hard onto the armboard. Tightness is surprisingly detrimental to performance and a totally misguided practice, based on intuition rather than proven comparison results.

Tonearm Name Clarification2017-12-14T11:30:56+00:00

For Rega arm and Origin Live OEM arms

The names of the various arms we modify and supplied in the past can sometimes cause confusion. In addition to this reviewers have sometimes used their own terms so we have produced this page is for clarification purposes.

The RB250 (& RB251 – 3 point mounting version) is a Rega arm offered by Rega dealers – the equivalent that we used to offer was the OL1 – an OEM tonearm manufactured by Rega – The OL1 is built to the same specification and standards as the RB250 but carries an Origin Live warranty not a Rega warranty – therefore all support should be referred to Origin Live or Origin Live dealers.
The RB300 (& RB301 – 3 point mounting version) is a Rega arm offered by Rega dealers.

The OL RB250 is a used Rega RB250 that an owner has requested to be modified by Origin Live.

The OL RB300 is a used Rega RB300 that has been modified by Origin Live.

OL1 is an Origin Live OEM tonearm manufactured by Rega for Origin Live – The OL1 is built to the same specification and standards as the RB250 & RB251 but carries an Origin Live warranty not a Rega warranty – therefore all support should be referred to Origin Live or Origin Live dealers.

The early Silver arms (up to MK3 version) is a tonearm supplied by Origin Live although it shares the base design of the RB250 or RB251.
The Exchange Silver is the same as the Silver tonearm but carries a substantial discount as the arm utilizes a used Rega RB250 base part that has been sent in as part exchange – this option is no longer available.

Badged OEM arms are supplied by Rega to a large number of different manufacturers such as Michell, Nad, Moth, Audionote, Basis, Thorens DNM etc – these arms carry the suppliers logo but are all recognisable as being manufactured by Rega since they look the same as Rega arms. OEM arms are called by many different names (usually prefixed by the suppliers name) but all can be modified by Origin Live.

Rega Tonearm Tuning & Setting up2017-12-14T11:26:38+00:00

For Origin Live & Rega arms – critical for optimising performance

Origin Live & Rega tonearms are sensitive to various adjustments – some of these secrets are not well know to owners or dealers. This page is designed to help you get the most out of your tonearm.

– Treat the arm with care as some parts can be broken. To this end ensure that all tightening of any bolts is carried out gently and without causing undue strain.

– When bolting the arm to a deck you only need tighten the large bolt to finger tightness or very slightly tighter (“nipped tight 1/16 turn”). It is best to experiment by listening to music. This may seem laborious but you will be richly repaid by improved performance. The mistake of over tightening this nut is often made, with the result that the music is deadened.

– Ensure that the TOP side of the tonearm is Parallel with a FLAT record, if not then use the threaded integral VTA adjuster on Origin Live arms or packing washers in the case of Regas. Tonerms are best tuned in by ear- if the tonal balance is bright and bass light them lower the base of the arm. If the balance is dull in the trable then raise the base of the arm.

– On the RB300 RB600 & RB900 set the tracking force dial adjustment to exactly 3 gram and leave it alone. It is best not to use the dial to set tracking weight. Instead set the arm tracking weight using a stylus balance and moving the counterweight. The reason for this is that the tracking dial uses a spring to dynamically load the arm – however this also feeds vibration into the arm and has been found to be disadvantageous to performance although it is more convenient from an adjustment point of view. Rega set the dial to be effectively disengaged at its 3 gram setting (this may sound strange but it’s logical if you think about it for long enough). The simple test to see if this is correct is to try it! If you find however that your counterweight is not heavy enough then set the dial at 2 grams and try again – Alternatively you can superglue on steel washers.

– Always use a cable clip to secure the arm cable and leave a slight droop on it so that it isn’t “tight”. This again is helpful to “earth” vibration in the cable.

Origin Live & Rega Arm Specifications
Effective Length 240 mm
Overhang 17.24 mm
Offset Angle 22.92 deg
Mounting Distance 222.76 mm

– The tip of the stylus should be 240mm from the pivot. In approximate terms, the armboard mounting hole should be such that the cartridge stylus will “overhang” the record centre (spindle) by a distance of around 17-19mm for an arm that is of 229-250mm Effective Length (distance from stylus to armboard mounting hole centre). Roughly check this by swinging the stylus over the record spindle.

– It is recommended to place a special cork washer (supplied by Origin Live) under the arm base nut.

– Lastly the sliding control for tracking bias should be set to be approximately equal to the tracking weight value. You can then fine tune this by ear using the centre track of a record. There are various methods from listening by ear to watching whether the cartridge cantilver deflects to one side or the other (you want to see not the slightest deflection when the stylus touches down on a centre track. This technique is only possible on cartridges with softer suspensions and longer cantilevers.

Additional notes for Origin Live modified arms

– On the modified OL1 or RB250 you will need to use a stylus force gauge (balance) to set the arm tracking weight. If your gauge measures in mN then 1 gram = 10 mN.

– Always use a cable clip to secure the arm cable and leave a slight droop on it so that it isn’t “tight”. This again is helpful to “earth” vibration in the cable. (Please note that the occasional rewired arm makes a slight “rustling” noise through the speakers when it is lifted across the record. This should not be a cause for concern as it only caused by microphony of the internal silver litz cable – under normal playing conditions this is inaudible. For rewired arms the additional earth lead should be connected to the earth of your preamplifier or amplifier. This earth lead is best separated slightly from the main leads so do not wind it around them for best performance. Avoid pulling the external wires at the base of the arm as they are not indestructible and can become detached if excessive force is used to manipulate them.

– When tightening the counterweight, set it so that the Allen bolt is at the side of the arm (not at the top) and tighten firmly.

Rega Tonearm Specifications2017-12-14T11:25:02+00:00

Low effective mass 11 grams
Effective length 240 mm
Overhang 17.2 mm
Offset angle 23 degrees
Mounting distance: platter centre to arm hole centre 221.7 mm
Diameter of mounting hole 23 – 25mm but 24mm is preferable as it allows threaded VTA adjuster to be fitted
Size of base mounting nut 32mm A/F (across flats)
Maximum armboard thickness 27mm
Total Weight 436 grams
Capacitance 0.002uF
Resistance 0.002 ohms

The tip of the stylus should be 240mm from the pivot. In approximate terms, the armboard mounting hole should be such that the cartridge stylus will “overhang” the record centre (spindle) by a distance of around 17mm for an arm that is of 240mm Effective Length (distance from stylus to armboard mounting hole centre). Roughly check this by swinging the stylus over the record spindle.

Rega Tonearm Mounting Dimensions and Installation2017-12-14T11:20:10+00:00

A modified Rega toneamr retains it’s original geometry and fitting in every respect – the modified Rega RB250 is also a straight swap for the RB600 and RB900 along with all other newer Rega Models such as the Rega RB251 and RB301.

If your arm is not a Rega it is certainly possible to fit the Rega tonearm to your deck but you may either have to modify your existing armboard or acquire a new one – (see a dealer for the second option). The Rega arms fit into a singe hole in the armboard – 24mm or 25mm in diameter. Once the arm is inserted through this hole, it is then secured by a large nut on the underside of the board which clamps it on. The centre of the Rega arm hole can be positioned anywhere on a radius arc 221.7mm from the platter spindle centre.

3 point fixing of newer Rega Tonearms

The geometry and mounting dimensions for the new type 3 point mount Rega tonearms is identical to their older arms – In addition to the single large 24mm hole, the 3 point mounted Rega tonearms need 3 small holes for either wood screws or M3 Allen bolts. These fasten the arm to the board. You are best to use the arm itself as the template to mark and then drill these small holes ensuring that the arm is oriented at right angles to the front edge if the deck.

The distance from centre of arm position to centre of platter spindle needs to be 221.7mm. Old style Rega arms with threaded bases can rotate to be fixed at any angle . The length of the arm from its mounting hole centre to the cartridge end of the arm is 245mm. The arm overhang to the rear is 50mm to the end of the counterweight stub. If you modify your current armboard you will need to cut out the board to take the Rega to the dimensions given above. This will leave you with a hole to the side of the arm. However this can be hidden if you make up a large circular plate washer of black card, aluminium or other material and glue this to the armboard – the spacing washers we supply with a new arm have an outside diameter of 48mm and will formally fulfil this function for most situations ( the thickness of the washer is 2mm). The advantage of gluing the washer to the armboard is that it also locates the arm in the correct position.

In terms of relative height, the arm needs approx. 31 mm of height between the top of the armboard and the top of the platter – this enables it to be fitted almost exactly without even using spacing washers.

If your existing cut out is too large you can screw on one of our VTA adjusters to the underside of the armboard. This would give you infinite adjustment and improve the sound quality but see VTA adjuster to check whether you can fit this to your deck.

If you own a Linn we supply a pre-drilled arm board, identical in every respect to the Linn board but without the Logo or you can purchase a Linn armboard tor the Rega mount from Linn Products. We recommend that it is easy to fit the Rega modified arms to modern Linns even thought the corner piece can some times foul the arm as you can carve off the offending wood with a Stanley knife or equivalent.

If you have a Thorens deck we understand that you can purchase Thorens arm boards from
Technical & General, PO Box 53, Crowborough, East Sussex TN6 2BY     Tel: 01892 654534

What Cartridge Weights Will the Rega Tonearm Accommodate?2017-12-14T11:16:20+00:00

Using the standard Rega or Origin Live counterweight the arm will take cartridges up to 15 grams – which covers just about all cartridges.

Using the “heavy” counterweight supplied by Rega, the arm will take cartridges up to 20 grams but will have trouble balancing lighter cartridges.

Counterweight Position and Low Centre of Gravity2018-03-20T10:16:14+00:00

Counterweight Position and Low Centre of Gravity

A common idea that should be questioned is whether a tonearm counterweight should be positioned as close as possible to the yoke for best performance. This minimises inertia and thus reduces see-saw effects over record warps. A variation of this theme is that low slinging the weight drops the centre of gravity and thus stabilis

es the arm, reducing bearing chatter and vibrational rocking. We will address these two concepts in turn as the principles involved are entirely different.

Counterweight Position

Frequently you find that observations on the performance of particular arms make folk jump to conclusions that miss the real causes of the performance changes perceived. Although the theory of decreasing the inertia of the counterweight seems very plausible, there is another more proven explanation. When the counterweight is positioned at the end of the stub on an Origin Live arm, you are NOT losing performance.

The notion that counterweight position affects performance has much more to do with vibration and lack of structural rigidity than inertia effects – in other words, on some arms it pays to keep the counterweight close to the yoke as it decreases resonance effects from counterweight waggle. On these arms the counterweight causes an increasing vibrational whiplash effect as it gets further from the pivot. Origin Live have gone over and over this with their arms and established conclusively that the counterweight position hardly affects performance at all on a properly designed arm. The idea that inertia is an enemy is also based on pure ideology – the fact is that without inertia the stylus could not read the record groove at all. Some systems add weight at the headshell to increase inertia as it is proven to be beneficial up to a point.

Calculations show that an 8g increase in cartridge weight will increase inertia four times more than having your counterweight position at the rear end of your arm stub.

Counterweight Low Centre of Gravity

Another case of observations drawing questionable conclusions is the case of low slung counterweights. Low centre of gravity IS important for unipivot arms but dual pivots and gimbal arms do not “sway about” and listening tests prove, all other things being equal, that it makes no audible difference to sling the weight low. As previously outlined, any beneficial observations are usually down to a heavier weight or different method of attachment reducing resonance effects on certain arms but not Origin Live arms. This is something we have tried and tested repeatedly.

Many low slung weights use varying methods of clamping themselves to the rear stub. This alone is very influential on the sound but the mistaken assumption is made that the difference is due to low slinging

We have probably experimented with counterweight materials and attachment more than anyone. Avondale Audio was the first company to modify Rega counterweights and they sub-contracted us to produce them, since then this has become a bandwagon of inferior copycat ideas.

Calculation of Inertia

The following calculations are given to try and give a sense of proportion to a rather intuitive but incorrect notion. Inertia differences are relatively insignificant. To get the weight closer to the pivot, the counterweight has to be heavier and this adds inertia – all in all a difference of 20mm or so is not a big deal.

To illustrate this using laws of physics – the moment of inertia is m x r squared where m is the mass and r is the distance to its centre of rotation. Say that a 130gram counterweight is 45mm away from the pivot – moment of inertia is 0.13 x 0.045 squared = 0.26 x10 to the minus 3.

Equivalent downforce can be achieved with a 235g weight at 25mm from pivot so—moment of inertia is:

0.235 x 0.025 squared = 0.146 x 10 to the minus 3. This is a difference of 0.000114.

Now compare this with the much higher increase in moment of inertia cuased by a 16g cartridge in comparison to the average 8g cartidge.

Inertia is 0.016 x 0.220 squared = 0.774 x 10 to the minus 3 (0.220 is pivot to cartridge distance in m) 8 gram cartridge is 0.008 x 0.220 squared = 0.387 x 10 to the minus 3. This is a difference of 0.000387–nearly 4 times higher than the inertia saving of moving the counterweight in.

Go to Top