Avid Ingenium Motor Fitting Instructions
Instructions for fitting the DC motor to an Avid Ingenium supplied by kind permission of David G, London.
Tools needed. A set of small Allen keys, a Phillips screwdriver, a small pair of pliers (the pointy ones) and either a soldering iron or a drill (for the cable/hole)… and a little bit of patience. For reference, it took me around 45min start-to-finish.
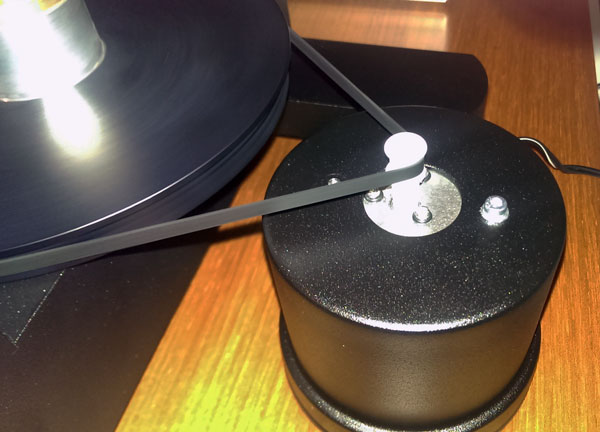
Photo above shows Origin Live motor fully fitted.
This was really pretty straightforward. I decided to use the original motor pod as I wanted to preserve the appearance of my turntable. It would be possible to manufacture another type of pod if you have reasonable DIY skills.
Disassemble the motor pod by undoing the 2 screws at the top. With a little coaxing, the heavy base of the pod & the entire motor assembly will come away (it’s only the mains cable that is now preventing it falling out). You can also loosen the screws in the base if you want. Take reasonable care as there will be a couple of screws & the motor loose inside the pod. You will need to retain these.
You will see the motor on a fairly long piece of cable, connected to a small circuit board that is clamped by 4 brass stand offs, 2 either side – they are bit like the ones used on computer motherboards but around 30mm long. You will need to re-use 2 of these. Whole thing is attached to the base – so unscrew it! The mains cable comes through the side of the pod & is clamped to the pod base with a plastic strain relief thingy, similar to that found on a standard 13 amp plug. Undo this to free the cable. You can then snip or de-solder the cable from the circuit board and remove it.
Undo 2 of the hexagonal brass standoffs, they thread into each other, so they can be screwed back together to make one long hexagonal rod with a threaded hole each end. This will be re-used to refit the base & connect it back to the pod. Take the DC motor assembly (with the small circular top plate) and position it where the original motor was – inside the pod. Pop one of the machine screws & washers, that you kept safe, through the top of the pod and the motor plate and then use the long hexagonal rod you just made as a nut. Don’t do it up too tight at the moment as you want a little movement in the rod. Just enough to stop the motor assembly wobbling around.
You will see that the spindle of the new motor doesn’t sit quite centrally in the pod, due to the hole positions being slightly different. This doesn’t matter as the whole thing is hidden by the platter anyway. One bolt is all that is needed to hold this in place. Just take care that the 3 little screws holding the motor plate to the motor don’t prevent the plate from sitting square & flush to the underside of your pod. You do not need any spacers or packers to adjust the height – using the standard long spindle, the spindle height should be spot on.
So now the cable. You will see that the plug on the end of the DC motor cable is a bit too big to feed through the hole in the pod where the original cable was. If you are half decent at soldering just de-solder the cable from the motor, poke it through the hole in the pod & solder it back in place.
If you don’t fancy this you can bore out the hole until it’s big enough to go through. First option looks tidiest. Second option won’t invalidate your warranty if you are as bad at soldering as I am. You can use the strain relief “thingy” to reattach the cable to the base of the pod if you wish.
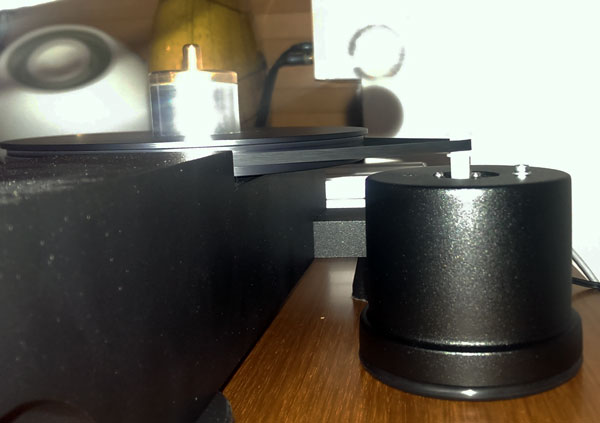
Put the base plate back in position trying to align one of the holes with the hole in the bottom of the threaded rod that is poking down, fiddle around for 30secs until it does align & then reuse one of the original screws to tighten the whole thing up. Not too tight – just enough to stop the motor plate moving under the belt tension. And that’s it – you are done!
Re-position your pod, fit & tension the belt (I used one of Origin Live’s flat belts – it IS better)…and enjoy! You can see the result in my pics. Belt rides correctly on the spindle & the turntable sub platter without any further adjustment needed. There is plenty of clearance between the bottom of the platter & the top of the spindle
Verdict on the Avid Ingenium motor upgrade:
On the Advanced DC kit with upgraded transformer & Origin Live belt:
Turntable: Avid Ingenium, with Origin Live Silver MkIII tonearm, Ortofon Quintet Black fed through a Graham Slee Elevator/Reflex phono stage.
OK so the kit set me back around 25% of the cost of my TT, arm & cartridge combined – so it needs to do something pretty special to justify that outlay. I mean a motor is a motor right? it just makes things go round at the right speed? Wrong!!
Was it all worth it? In a word: absolutely!! This DC conversion does exactly what it the manufacturer claims it will. I now feel that my turntable is punching way above its weight. Soundstaging is improved, as is the ability to hear deep into the mix and around the instruments. It’s like the sounds have a shape & substance instead of just being…ermm…a sound. Compared to my old AC motor, vibration is imperceptible, which I think must reap huge sonic benefits. My sample is also dead silent. Surface noise seems reduced too, though why this should be I don’t know. My overriding impression is that the motor is just getting out of the way & allowing the rest of the kit to perform unfettered. Some so-called upgrades are really just a bit tweaky, you almost have to convince yourself that you’ve made an improvement instead of just a change. No question of that here. It is flat out better and it is obvious.
Dave G – London