Replace Linn Sondek LP12 Lingo/Valhalla Motor
Linn Sondek LP12 Turntable set-up and tuning instructions.
The Linn LP12 motor is not only very easy to change but is incredibly effective as an upgrade.
To fit the DC motor kit to the Linn Sondeck LP12 turntable is very straight-forward and is accomplished by carrying out the following steps. No drilling of the top-plate is required and the modifications are easily reversible should you ever wish to sell your Linn but retain the DC motor.
Unplug the deck from the mains supply for obvious safety reasons and before doing any work allow the Valhalla capacitors to discharge for 45 minutes. Do not remove the Linn Sondeck LP12 baseboard cover before this period is over as there is danger of lethal electric shock.
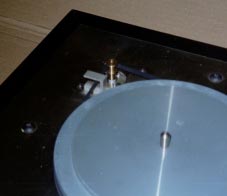
Origin Live motor and pulley fitted
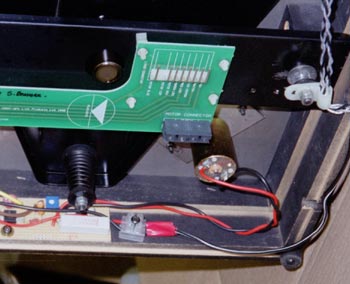
Showing motor fitted from underside view. Old Linn Lingo or Linn Valhalla board can be removed to further improve the sound once you are certain you are keeping the upgrade
You MUST also remove the mains plug at this stage to avoid any possibility of someone plugging it in at a later stage. You will not need the Linn electronic power supply any more, so it can either be detached entirely or simply left in place for quick reversal of this modification. The LP12 will sound better if the Valhalla board is removed entirely due to the additional resonance it inputs to the plinth.
Unscrew the baseboard from the Linn – the screws, which hold on the 4 rubber feet and 2 others, usually hold it on.
Disconnect the 4 wires leading to the Linn motor (2 grey, 1 blue, 1 red) by slackening the screws holding them at the terminal block. Note the positions for each color of wire in case of needing to refit the Linn motor.
Unscrew the 2 slotted pan head screws that control the tilt of the Linn motor.
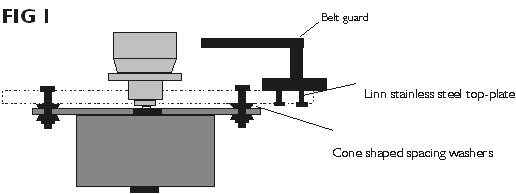
Unscrew the 2 black round headed Allen screws that hold on the Linn Motor – you may need to slacken off the nuts underneath first. This will allow you to remove the Linn motor but be careful not to lose the 4 cone-shaped spacing washers that reside between the top of the motor and the bottom of the stainless steel top plate (see Fig 1). It is also recommended to remove the belt guard as this can rub against the belt depending on how your Linn is adjusted.
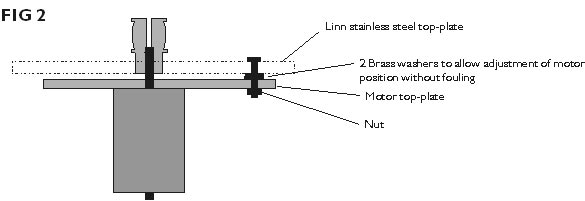
Now fit the DC motor as shown in Fig 2 below using an original black round-headed Allen bolt and nut plus the 2 brass washers supplied with the kit. The brass washers only serve as spacers – they are not designed fit directly under the bolt heads. The bolt only need to be “nipped“ tight for best sound quality and the distance from centre of platter to motor pulley centre should be adjusted to approx 127 – 129mm for correct belt tension (start at 127). There are 3 holes drilled in the DC top-plate to allow extra flexibility in positioning the motor as Linns differ slightly in dimensional set up. For tension see also notes on wiring the power supply.
Now connect up the control box, to the Linn LP12, set the speed (see above) and enjoy your new turntable motor!
Linn with existing AC synchronous motor