Pink Triangle Turntable Little Pink thing LPT Motor Supply Kit Fitting Instructions
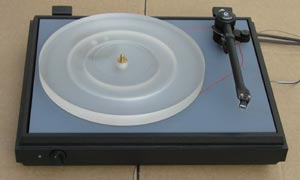
Pink Triangle Finished Platter
“A quick note to say how astonished and delighted I am with the performance of the Origin Live DC motor that you supplied and fitted to my pink triangle turntable ‘little pink thing lpt’. For once the journalistic hype is true, the sound of records played on the pink triangle deck with the OL motor is phenomenal. Bass is extended and cleaner with fantastic definition, midrange is wonderfully open and the airiness for the treble lets the listener into the whole recording acoustic. Anyone who hasn’t fitted your DC motor and is still wondering how to get the best from their records should do so straight away. It is such an incredible bargain at £339 that I am left wondering what took me so long!”
Chris Moorhouse
The existing motor plate is replaced by an Origin Live motor plate and mounted level with the top of the pink triangle turntable plinth. The MDF baseboard needs the motor hole enlarging to allow the motor to protrude from the bottom of the deck – it also needs a 1 x 4.5mm dia hole drilled to re-site the motor plate support bolt.
Procedure
Undo nut on the underside of the platter bearing – long nose pliers will do if you don’t have a socket spanner. Lift top board off to expose turntable base board and motor as shown below. Lift out motor – it pulls out with the 3 rubber mounts which are just tight fitting not screwed or attached in any way.
Enlarge hole for motor in baseboard to approx 40mm diameter to allow the motor to be fitted – the motor is best not attached to the top board if you want minimal noise through the speakers. I found drilling the hole easiest by drilling a 3mm hole through from the top and then going through with a 1.5″ fluted cutter from the underside with plinth turned upside down.
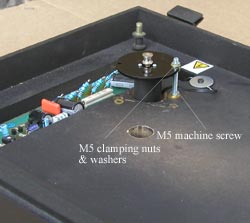
Drill 5.5 dia hole for M5 machine screw – position the motor plate (with motor attached) and mark the 5.5mm hole position as shown on photos below. Ensure the pivot bolt hole is positioned on the radius line 90mm from platter bearing centre – this avoids the M5 pivot bolt fouling the platter and belt. Also ensure that the motor is clear of baseboard hole and free to swing to allow belt tension adjustment.
Fit the M5 bolt with a large washer under the base board, next fitting the M6 then M5 brass washers – then thread on the M5 nut to clamp these to the base board.
Using 2 M5 nuts and 2 M5 washers clamp the motor plate at the correct height – i.e. the top of the motor plate is level with the top of the plinth. If you tighten this to a reasonable tension you can swivel the motor to give the correct tension and it will hold in place by friction.
Parts Provided By Origin Live
- Short pulley
- M5 X 80mm machine screw bolt
- Round plate 65 dia with 5mm dia fitting hole
- 2 repair washers 25mm dia
- 3 off M5 nuts
- 3 off M5 washers
- 1 off M6 washer
- 1 off No 6 x 3/4″ cross head screw
- 1 off cable clip
Photos to show installation method
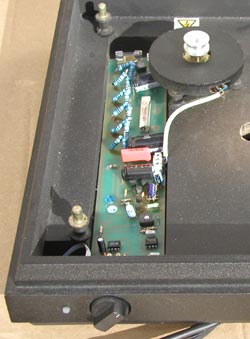
Pink-Triangle-Original Photo of original AC motor to be removed by lifting out of base board. Detach all power leads.
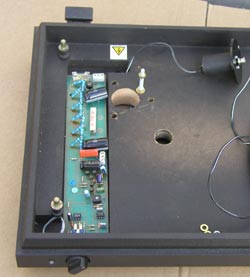
Showing enlarged hole in place of old motor to allow fitting of deeper Origin Live motor
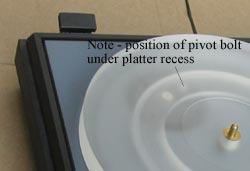
Before drilling the 5.5mm hole for the motor pivot machine screw – note that it must be positioned to avoid fouling the platter.
View of motor fitted using round motor top plate supplied by Origin Live – height is set by clamping nuts on either side of motor plate.
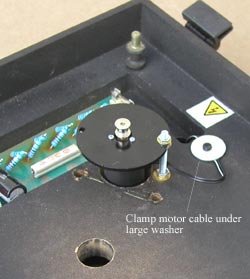
Motor power wires are clamped in position using large washer and screw. This prevents straining the soldered joints on motor.
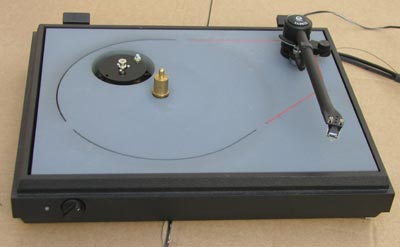 Finished installation.