Acoustic Research DC Motor Kit
This Turntable is fairly straight forward to modify and only needs a single 2.5mm hole drilling in the top plate (which takes all of 30 seconds).
Additional parts provided for this DC Motor Kit – 1 off 2.5mm nut, long pulley, no motor top plate
- Disconnect the Turntable power supply from the mains by removing the mains lead plug from the wall socket
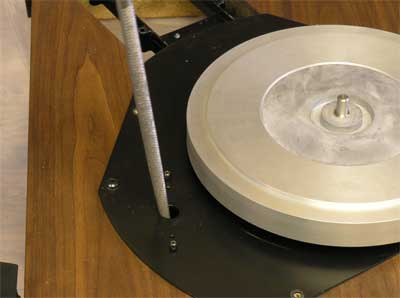
- Remove plastic cover, base board, platter and drive belt
- Make sure tonearm is secure in the arm lock. Place deck
- Remove the old motor
- It is optional but you may pay to elongate the hole with a round file to allow for different motor positions which affect belt tension. On the AR turntable we modified this was not necessary as the belt seemed pretty tight anyway but it may not have been the correct belt. Use guidance notes with each motor kit to set the ideal belt tension. This is not critical but avoid an over-tight belt as this can cause motor wear.
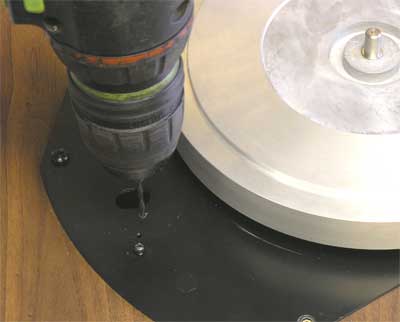
- Drill a 2.5 (best) or 3mm diameter hole in a position 10mm out from the centre of the desired pulley position.
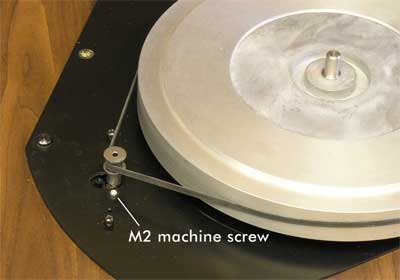
- Using the single M2 screw provided fit the motor in the position as shown – The motor only needs a single screw to hold it and this allows it to be swivelled and stay in position if the screw is just tight enough. OPTIONAL: To enable the motor to swivel you can fit the 2.5mm nut provided between the top of the motor and the underside of the top plate. This spaces the motor sufficiently away from the top plate to allow it to swivel without catching the top plate.
- Refit all items removed and your upgrade is finalised.