Record Player Motor and Power Supply general fitting methods
Overview of fitting the Record Player motor to your deck
Guidance notes are supplied with the kits. These additional notes are provided to overcome issues that may arise on individual decks. Sometimes the depth of a record player motor means that a deck needs taller feet to lift it clear of the surface on which it stands.
Sometimes a hole needs to be cut in the deck baseboard to allow the motor to be fitted. A hole saw mounted on a drill is the best tool for the job (see hole cutting tools.)
Alternatively the baseboard can be left off altogether as the voltages are no longer dangerous (12V max). Leaving off the baseboard will also improve the sound of the deck due to reduced resonance.
Record Player Motor Dimensions
Fitting the motor to your record player is all you need worry about as the remainder the kit is plug and play. The dimensions of the motors and their mounting plates are described as follows which may help you to work out how best to fit them.
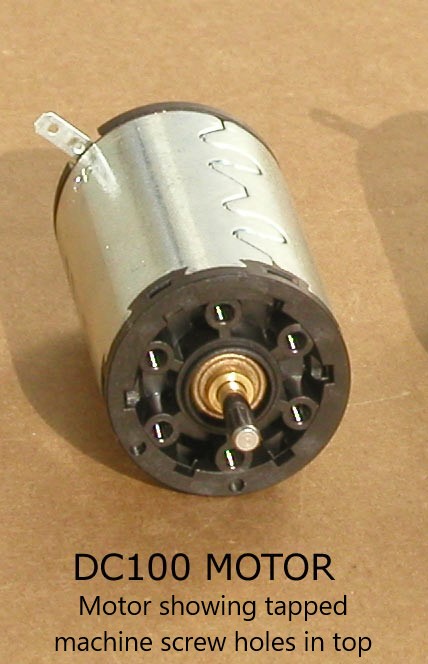
DC100 motor included as standard with every motor kit – body is 29mm diameter and 46mm long.
Height of motor with tall pulley: 60mm
Height of motor with short pulley: 52mm
For Drawing of motor mounting please click here.
Record Player Motor Mounting Plates
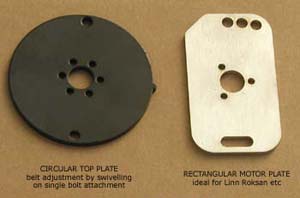
We offer 3 sizes of motor mounting plate which gives you more flexibility. Normaly you will receive the correct plate for your particular deck as we know the best answer for the more popular record players. The plates are listed below
A rectangular mounting plate is fitted to motor as standard. Dimensions 70mm x 40mm x 2mm with mounting holes spaced 60mm apart.
Circular plate 65mm in diameter with mounting holes spaced 57mm apart is available on special request.
Small round motor plate 50mm diameter with notches for screws (bolts) at 48mm pitch diameter – ideal in pods like the Michell Gyrodek and Orb. Available by special request.
Only one mounting hole need be used to fit the first 2 motor plates to a deck. The plate may then be swivelled to set belt tension.
Plinths With Thick Top Plates
Sometimes the motor plate must be mounted on the top of a thick MDF top plate in a way that would add too much height. In such cases, a “milling machine” attachment in a pillar drill may be used to cut away the MDF to the correct depth and allow the motor top plate to sink into it. Alternatively a router or sharp chisel may be used.
Methods Of Fitting The Motor
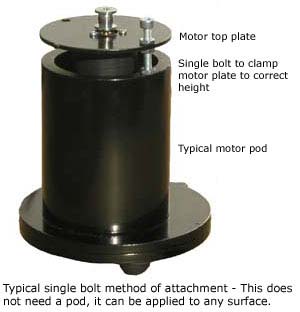
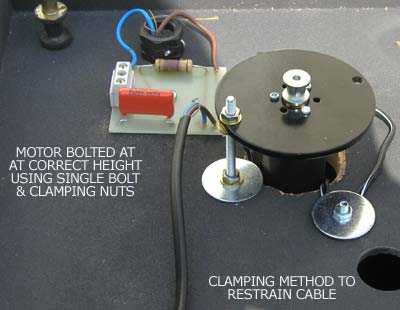
These can vary from screwing it on using the tapped holes in the mounting plate to wedging it in position with pieces of hard foam – the motors run cold so there is no overheating problem. Note that the motor sounds best when the top plate is mounted with a single bolt. This allows easy adjustment of belt tension by simply swivelling the whole assembly. It also gives considerable scope for setting the height of the motor using a single machine screw and nuts: the nuts can be used to clamp the motor at any height along the machine screw length.
Motors With Pods
For turntables with pods which house the old motor you can adapt the pod to house the new motor – We supply a circular motor top plate for these applications which means that after unbolting the pod’s existing top plate, the Origin Live motor top plate can usually be bolted to the pod using one of the redundant tapped holes – the new DC motor top plate only needs to be fastened using one bolt.
This method is not always possible and so alternative methods are to get a machine shop to tailor your old pod to fit the OL DC motor – it may need recessing to get sufficient pulley height – some people give up at this point wondering if it’s worth the trouble but anyone who ever just gets up a rough working set up to see what the new motor sounds like is immediately convinced to go ahead.
One last method is simply to pack the motor into the pod by wedging it in position using pieces of hard foam, rubber, Plasticine, blutak or hot melt glue – crude though this may be it works and as the motor runs cold there is no problem on that front.
Belt Length
Belts are measured by their circumference in mm. There are two ways of doing this:
- Thread length. Put a length of thread round the belt path i.e. the motor pulley and Sub-platter, mark it and then measure the length.
- Actual length. Take the old belt. Measure the length of the belt pulled (without stretching) straight and then double the figure.
Pulley Choice
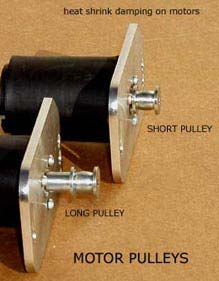
The centre of a flat belt rides on the crown of the pulley (the crown is the fattest part of the curved section of the pulley). Round belts ride in the top or bottom notch of the pulley.
On the Origin Live “short” pulley the distance from the top surface of the motor plate to the crown is 6mm.
We supply a “long” pulley for use with the Linn LP12 and most other decks. In this case the distance from top of the motor plate to crown is 14mm.
The motor plate is normaly 1.5mm thick.
Pulleys are a special high grip white plastic not the aluminium type shown in the photo. They are also precision bored for smoothest possible running.
We stock various pulleys which are press fitted to the motors – if you have the wrong type of pulley for your deck DO NOT TRY TO REMOVE THE PULLEY or you will probably wreck an expensive motor. The motor should be returned to us complete with pulley and we will change it over.
“Short pulley” 8mm diameter at crown 11mm dia overall is useful for decks where the motor is mounted close to the height of the top of the plinth.
“Long pulley” is useful for decks where the motor is mounted under a thin top plate e.g. the Linn LP12
The pulleys are designed to run with flat and round belts so there is no need to specify a different pulley for any type of belt (round belts ride in the top or bottom rim recess).
All operating voltage ranges quoted on this page assume the DC100 motor is to be installed. The lowest operating voltage of a switch box is always noted on the rear of the switching box.
Note: the photos below are a representative likeness only