Tonearm Troubleshooting
We understand the frustration that occurs when a system malfunctions. Tonearms need to be set up correctly and are one of the more potentially problematic items of equipment. This is a list of problems and solutions to hopefully get you out of trouble. To save time just skim down the sub-headings till you get to the relevant section for the issue you need an answer for. These notes contain over 30 years of experience and try to cover every eventuality hence they are extensive.
Please note that once this suggestions on this page have been exhausted and your arm needs fixing, then it should be returned to us. Professional repair shops and rewiring firms should not carry out the work unless expressly approved by ourselves on a case by case basis. This policy is not protectionism but to ensure you do not end up with a wrecked arm. Our arms are unique in many respects and outside experts are not familiar with the many pitfalls.
Electrical
Sound Quality
Mechanical
Lift / Lower Device Problems
Arm lifts can develop various problems. Origin Live arms have 4 different designs of lift lower over their history so you need to work out what applies to yours in the following.
Rate of drop is too slow or fast
- If too slow you can reduce the “drop” distance by lowering the height of the curved arm rest.
- You can increase the spring force by stretching it slightly – this is described below and not easy.
- Without load on the cueing rest, it should take 4 to 14 seconds to drop fully (ignore the lever movement as this continues dropping after the rest hits bottom). Contrary to popular belief , very slow descent times are detrimental to cartridges and your vinyl records as they tend to “graze”records and skip track sometimes before settling into the groove. This does far more damage to records than faster descent times. Hand cueing is a relatively very fast descent time compared to a lift lower device but even this is not close to dropping a cartridge (over 10 times as fast if it drops). Many high end reviewers with steady hands happily hand cue expensive cartridges without a problem.
Arm Lift at Wrong Height
Arm lift is usually adjusted by altering the height of the curved rest.
On latest arms you need to remove the grub screw in the top of the arm rest and either add or remove the small nylon spacing washers under the rest.
If your curved arm rest has a grub screw in the side, you adjust height by:
- Slacken the grub screw using a 1.27mm Allen key.
- Resetting the position of the curved rest and then re-clamp.
- If you do not have the correct size Allen key then try filing down a slightly oversize one to a “wedge” shape thus guaranteeing a tight fit.
- If you lose the grub screw then order an M2.5 x 3mm Allen set screw.
For older Origin Live arms and above you can also adjust arm height by slackening off the grub screw in the arm plate and changing the height of the lift lower device.
Arm Queuing Device Not Lowering
Remove the curved arm rest piece by undoing the tiny M2.5 Allen bolt in the side – Use a 1.27mm size A/F Allen key. You will then see that on the silver metal disc portion under the curved arm rest piece are 2 “notches” opposite one another in the side of the disc. This metal disc is threaded, so gently push on one of the notches to fractionally undo the disc. There will come a point where the piston should free up – bear in mind it is a slow descent. When it is working re-attach the curved lift. If this fails then continue turning the silver metal disc till you can remove it and then remove a little of the grease inside the pot. Re-install the silver disc and try again. When it is working re-attach the curved lift.
Stretching the Spring
With regard to the lift lower device not working there is a possibility that low temperature can sometimes stop them working till they warm up to room temperature. in other words if something comes off a cold van or cold store room it takes a while to warm up.
If temperature is not the problem then the arm can be fixed by stretching the spring inside and making it about 1mm longer. This is not difficult and certainly takes less time than doing anything else.
Please see video link below to remove and dismantle the lift lower device.
https://www.youtube.com/watch?v=dqFaen07ZMU&feature=youtu.be
How to stretch the spring:
You will see the spring inside the lift lower device just pull it out and do not dismantle the piston or anything else.
Measure the spring length BEFORE you stretch it. Then gently pull spring to permenantly stretch it very slightly. When you measure it again, your target dimension is for the spring to be about 1mm longer than it was originaly. You may need several attempts to get this right.
Put the spring back such that the sharp cut end of the spring is uppermost and re-assemble on the arm.
Please note that fast descent times of a cartridge onto a record are much less harmfull to vinyl than slow descent times which can “graze” the record and even cause track skipping. Many experts do not use the lift lower device and hand que instead. The speed of descent for hand queuing is very fast compared to lift lower devices but does no damage. I’ve set the needle mid track on the same record over 100 times in testing and there is no degradation or noise from doing so.
Obviously dropping a cartridge onto a record rather than gently lowering it is extremely dangerous for cartridges so hand queing is not a good idea for those with unsteady hands.
Enterprise Lift / lower – Fixing Lift lower devices of the Enterprise is different to other arms and not so easy. We can fix this if you return the arm or just the lift / lower device to us. A dealer may be able to unfasten the lift / lower from the arm or you can do this yourself if you have the right size circlip pliers.
First the curved rubber arm rest must be removed by slackening off the very small grub screw in the side.
The top silver disc with 2 notches in opposite sides must then be rotated anti-clockwise using circlip pliers in the notches – sometimes just loosening this frees up the mechanism to start working again. Sometimes it’s possible to carefully push the notches with a small screw driver but be careful not to let it slip or you will scratch the armboard.
If this fails then continue turning the silver metal disc till you can remove it. Pull out the piston upwards and then remove a little of the grease inside the pot ( keep the grease removed as you may want to re-apply it and it’s a very unusual specification. This particular grease is essential for correct operation – the more you apply the slower the piston drops.
Once the silver disc is removed, pull the mechanism down and remove it from the armboard along with the spacer rings ( do not loose these). To keep all parts together re-assemble the mechanism (on it’s own) and send to us.
Lift / Lower Device Loose & Swivelling
The internal part of the lift lower mechanism needs to be tightened up using circlip pliers on the two cut notches in the top silver disc – you may or may not need to remove the curved finger lift first to gain suitable access with the circlip pliers.
Arm rest will not remain in lifted position but drops
Usually the lift lower needs returning for repair or you can replace with a new one ( if your arm is current).
When the arm lever is in the fully raised position, it must travel beyond vertical of the arm will not stay up. If you notice that this is not the case then adjust the angle as follows.
- Some arm lifts have a grub screw which clamps the lift lower lever. For these, you can alter the angle of the lever by slackening the grub screw then adjusting the lever angle before re-clamping.
- If you lever screws directly into the axle then simply bend it to the correct position.
Arm has tendency to swing strongly to one side or the other even when level and with zero side bias force.
Origin Live arms from the Encounter up are fairly free from inherent side bias but if you find this does occur first check that your PLATTER (not the deck) is level. If your arm still has a strong tendency to swing one way or another then it’s because of slight residual twist in the cable exerting influence through a slight tightness between the cable exit from the arm tube and the top of the arm base.
To minimize the internal cable tension in the gap between the exit from the arm tube and the entrance to the arm base carry out the following procedure. The trick is to get a thin flat ended screw driver or similar and gently poke the cable sideways to introduce a slight bend into the wire and then poke it back the other way to release the tension created by the bend. This has the effect of releasing the tension in the wire. The wire is contained in a white colored sleeve.
Sometimes there is residual twist in the arm cable that works its way out in transit. A simple test is to set the counterweight to zero or slightly negative balance and set the arm central over the record.
When you let go of the arm in space, (not touching the record) watch to see if it swings back towards the arm grip with speed. Ideally it should stay in the middle of the record but usually there will be a tendency to move gently inwards or outwards. If this tendency is severe then you can “untwist” the internal cable by rotating the arm one complete turn (360 degree rotation) IN THE DIRECTION THAT THE ARM ROTATES when released from its centre position over the record. You will need to remove the arm clip to rotate the arm fully (undo the bolt underneath).
Untwisting the cable is shown at the end of the video “Checking arm bearings and correcting extreme side bias”
Notes on Rega arms modified by Origin Live
All Rega arms seem to have inherent side bias built in and there is nothing that can be done about this. Some newer Rega arms have a side bias that needs pulling out and owners have left it pushed in (maximum side bias) which is often excessive and causes skipping.
Tracking Force is inconsistent / variable
If you have adjusted the azimuth incorrectly at any time in the past, this may need resetting to original position as per instructions.
Your force readings may be inaccurate due to :
- Digital Force gauges can give false readings when damaged or batteries get low. You also need to ensure that the cartridge lands on the same place on the scales as this can create variation.
The powerful magnets on some cartridges create reading variations which you can see in the readout before even putting the cartridge on the scale.
Also be aware that digital scales can vary their readings when you switch them on, then off, then on again. - Balance scales have a pivot axle which can become sticky and lose freedom of movement.
- If you suspect your readings may be inaccurate, check them against another force gauge.
How to Fix a Loose End Cap on the Yoke (Encounter, Illustrious & Conqueror only)
To fix this problem carry out the following.
1. Re-insert both transit bolts – this lines up the 2 end caps (which contain the pivot points).
2. Remove the counterweight and as you look at the rear face of the yoke you will see 4 holes (not counting the centre one).
Insert a 2mm A/F (“Across the Flats”) allen key into the inner hole on the side with the loose end cap. You should then be able to locate the Allen key into a socket grub screw in the end cap and tighten hard by turning clockwise.
3 Remove the transit bolts and all is set up correctly.
4 Check the end cap has clamped on by twisting it while holding the end cap on the opposite side. If it does not move, they are both clamped on correctly.
If this does not do solve the issue then there is most likely a problem with the Yoke End Cap and the arm will need to be returned to us.
If you are outside the EEC, we will need to email you instructions on how to send the arm.
Tracking Problems – Cartridge Skips, Mis-tracks or seems to have excessive side bias
The angular-mounted position of the arm
The angular-mounted position of the arm should be such that the cartridge tip is between 50 to 80mm from the edge of the record. If it is more than this, you may encounter tracking problems in the inner grooves due to increased cable twist.
Check items below in order of numerical sequence
- When you think side bias force is wrong then it helps to clarify exactly what the symptoms are. For example:
- Is it that the arm moves to the right as it is being lowered?
- Is it that the arm swings outwards when it is in perfect balance (not touching the arm rest or the record? – this is normal and most arms do it.
- Is the arm mistracking on the record?
- How do you know if is too much side force? is it a test track? The problem is that there are many highly unreliable ways to estimate correct side bias and the only reliable one is to listen.
- Sometimes perceived mis-tracking distortion can be mistaken for an incorrect gain setting on the phono. If the gain is set too high on the phono stage it will overload the input on your amp or pre-amp. Please note that not all your records will distort in this scenario, as different records produce different signal levels. So whilst some of your records may not overload the input, others will.
- Check the tracking force is in accordance with manufacturer specifications.
- Check the cartridge head-shell wires are clear of the record.
- Check the arm is parallel to the surface of a FLAT record with your cartridge sitting on the surface of the record. If the rear of the arm is too low then the arm can foul the curved arm rest on the lift lower device, so raise the arm base.
- Check the curved cueing rest drops completely clear of the arm tube when the arm is on your thinnest records. If the curved rest touches the arm occasionally as the arm is playing then skipping occurs. The solution is to lower the cueing rest using as per the video on how to adjust or change the lift lower device.
- If arm only mis-tracks when being lowered into a groove then the descent of the lift lower is too slow and needs changing as per video link above.
Another potential cause for movement is that the thin rubber strip on the Curved arm rest is missing.
Alternatively, the rubber may have lost it’s “grippiness” over time – this is easily cured by gently rubbing it with abrasive paper (150 – 240 grit is best). - Check the side bias hanging ball is free and not twisted round the wire loop or similar.
- Check that the wire loop is roughly level with the side bias rod, and if necessary, adjust it to be level. If the wire loop is significantly higher than the side bias rod, it introduces excess friction on the side bias line.
- Check side bias force is not excessive, too little is better than too much and the “clamp ball should normally be close to the yoke (arm pivot point) rather than far out along the side bias rod. Test tracks are usually overly modulated and the Soundsmith website has a lot to say about why you need to be very careful not to rely on these. If side bias is definitely excessive then scroll down to next “+” topic below this one.
- Check that the thread holding the falling ball weight is not tangled or wrapped round the wire loop. It must be free to fall unrestricted.
- Check that no knots have formed on the thread and that it is smooth to the touch and undamaged.
- Check that the ball weight is not fouling the wire loop at the top of it’s travel when playing inner tracks.
- “Check the side bias wire loop wire is at the correct angle when looking down on the top of the arm. If this is angled too far back it can cause skipping on the end tracks of a record. If necessary you can bring it forward of the template position.
- It sometimes pays to try VTAs (different arm heights) as the VTA of the cartridge cantilever is not always absolutely precise. Note: cartridges can suffer from slowly collapsing suspension over time.
- For some cartridges like Lyra’s – it is essential that they are set up using the stylus line as the alignment reference NOT the cartridge body – Lyra set up their cartridges individually and the stylus are not often aligned with the body.
- Check that the cartridge stylus is not dirty – try proper cleaning fluid (not iso-propanol which can damage the glue on a stylus). Also try “Green stuff” abrasive paper very gently.
- Check stylus for a bent cantilever.
- Check the cartridge body is clear of the record surface as cantilever suspension can sag when old.
If these first checks do not solve the problem you will need to go deeper.
If the arm is skipping in the same point on different records it indicates a sticking bearing
Video on how to check your bearings
Serious Mis-tracking Due to Stiff Horizontal Movement
First of all it should be said that very few cartridges will track some test records successfully on severe test tracks so it is unwise to get overly concerned about this – however if there is obvious mis-tracking when you would not expect it then the following checks should be carried out to establish freedom of movement of the arm.
First set the tracking force to zero so that the arm just “floats” in space. Now lightly move the arm with your finger whilst in the fully balanced state i.e “zero tracking force. Does it glide easily in space over the record surface in the horizontal plane? Similarly, does it move up and down freely without any “sticking”.
Side Bias Suggestions
– If your arm is over 5 years old it may be worth cleaning the sliding surfaces of the side bias wire loop and thread.
– Try different side bias settings using the centre track of a record and listen for focus of the sound see video “tuning your tonearm by ear. This is a rather long video that you may want to fast forward to near the end where it talks about how to set side bias by ear.”
Problems Due to Stiff VERTICAL Movement or Collapsing Cantilever
Checking Vertical Movement – Freedom of movement is best checked by putting the arm into about 0.3 gram tracking force and seeing if the arm “bounces” when dropped onto the curved finger lift. It only needs to bounce once.
Please note that Origin Live arms are slightly stiffer than most, in the vertical movement because we use internal wires that are the maximum thickness for low resistance whilst maintaining permissible freedom of movement.
For the Alliance to Zephyr arms and ALL MK1 arms
If the arm is not free in the vertical axis you can slacken the end buttons of the horizontal axle very slightly by unscrewing one side (anti-clockwise rotation) to give the axle a little end float (movement) – this does not degrade performance.
If the arm is not free moving across the record it will probably need to come back to us for repair. Note The Mk3 Silver arm buttons do not have an Allen key socket so you need pliers or mole-grips to grip the end button – to save damage protect the button using card or masking tape under the plier jaws.
For all dual pivot arms Encounter and above
If vertical movement seems to be sticking, it may be that the pivot spikes have dislocated from their central position in the pivot cups. Try lifting the arm tube in the yoke to re-locate the pivot points – let it drop back into the pivot cups. Then without lifting the arm, ensure you can move the arm horizontally by about 1mm backwards and forwards and left to right in the pivots.
For Rega & OL1 Arms
The likely cause is no end float (freedom of end movement in the direction of the horizontal axis running through the yoke bearings (i.e the bearings that control the vertical motion of the headshell end). To fix this, use a pointed razor blade to prise off one of the round plastic covers (on the ends of the horizontal axis running across the yoke). This exposes a brass threaded insert with a slot. Turn it anti-clockwise, a fraction at a time until the arm frees up and has a tiny fraction of end float that can only just be felt. If you find the threaded insert impossible to turn, then you will need to heat up the brass insert to soften up the anti-vibration locking fluid – this is best achieved with a soldering iron applied to the brass with plenty of solder to aid heat transfer. Once hot you will be able to turn the brass insert with ease but it may stiffen up again as it cools.
You can check the arm bearings by “feel” – if there is any resistance or “notching” then the arm bearings have gone.
We suggest you try a change of cartridge to see if this solves the problem.
When we modify arms we do not touch the bearings and this type of failure is very rare thankfully. It is a failure that occurs regardless of modification due to inherently defective bearings that get through quality control and then develop a fault. Once an arm is modified Rega will accept no responsibility whatsoever for any type of failure which is fair enough – however it puts us in a very difficult position.
Headshell Appears Twisted or Azimuth is Not Correct
If the headshell appears out of level with the armboard or platter – check that the arm is mounted dead true and vertical in the arm board as this can sometimes be out of vertical depending on the method of mounting. For Origin Live Encounter and above the VTA clamping grub screw must be nipped tight or the arm will have sideways play and can tilt very slightly.
Next check that the headshell is level to the top of the yoke – it is best to use 2 rulers – one held to the UNDERSIDE of the headshell and the other to the top of the yoke. Both rulers must be held parallel with one another when looking down on them. The topside of the headshell is polished and not necessarily accurate as material is not always removed perfectly evenly. You can also use a square bodied cartridge and mirror method to check azimuth – basically you place the stylus on a mirror laid on the platter and check that the reflection is straight with the stylus – this is described more fully on various web sites.
Lastly if you are using a spirit level, be aware that some engineering spirit levels have such high sensitivity that they are impractical for the 0.25 degrees of accuracy required on a headshell setting and consequently demand unrealistic levels of accuracy.
Quite often perceived azimuth error is associated with an incorrect method of measuring levelness. If you are checking that the headshell is level with the yoke then you must ensure that any rule you place across the headshell is in the plane shown in the diagram below.
Headshell Azimuth Factors For Dual Pivot Arms Only
1. Azimuth must be checked with full 2g TRACKING FORCE and arm set in similar situation as if playing a record i.e NOT resting on the arm rest. The easiest way to do this is to support the arm at the headshell end such that the tube is approx parallel with the record – a pile of coins is one way of achieving the correct height.
2. If a bubble gauge is used on the assumption that the headshell is parallel on the top to the underside then be aware that some bubbles are FAR more sensitive than others by a factor of 100. This means that although the bubble gauge may be measuring out the actual real world error is absolutely insignificant. Cartridge stylus are not exactly perfect so this sort of perfectionism bears no relation to the real world.
Pivot Point adjustment and checking for MK3C arms and above
If none of the above answer an azimuth problem then the arm will need to be returned to us.
Yoke Isn’t Level
Headshell Azimuth Factors For Dual Pivot Arms Only
1. Azimuth must be checked with full 2g TRACKING FORCE and arm set in similar situation as if playing a record i.e NOT resting on the arm rest. The easiest way to do this is to support the arm at the headshell end such that the tube is approx parallel with the record – a pile of coins is one way of achieving the correct height.
2. If a bubble gauge is used on the assumption that the headshell is parallel on the top to the underside then be aware that some bubbles are FAR more sensitive than others by a factor of 100. This means that although the bubble gauge may be measuring out the actual real world error is absolutely insignificant. Cartridge stylus are not exactly perfect so this sort of perfectionism bears no relation to the real world.
Pivot Point adjustment and checking for MK3C arms and above
If none of the above answer an azimuth problem then the arm will need to be returned to us.
Channel imbalance – one side sounds louder than the other
This is a very unusual problem which is not always soluble without a balance control on your amplifier. Possible causes are as follows:
- Hearing loss in one ear – permanent or due to wax build up. This is a known issue.
- Cartridge fault due to a fault such as a bent cantilever, failed suspension etc
- internal wiring fault in tonearm cable
- Fault in the phono stage or anywhere else in the system. Use fault finding techniques outlined above in “wiring faults” to establish where the problem lies.
- Side bias excessive on one side but this does not affect things as much as people expect.
- Azimuth setting hardly ever affects channel imbalance.
Undo the Clamping screw in the counterweight completely.
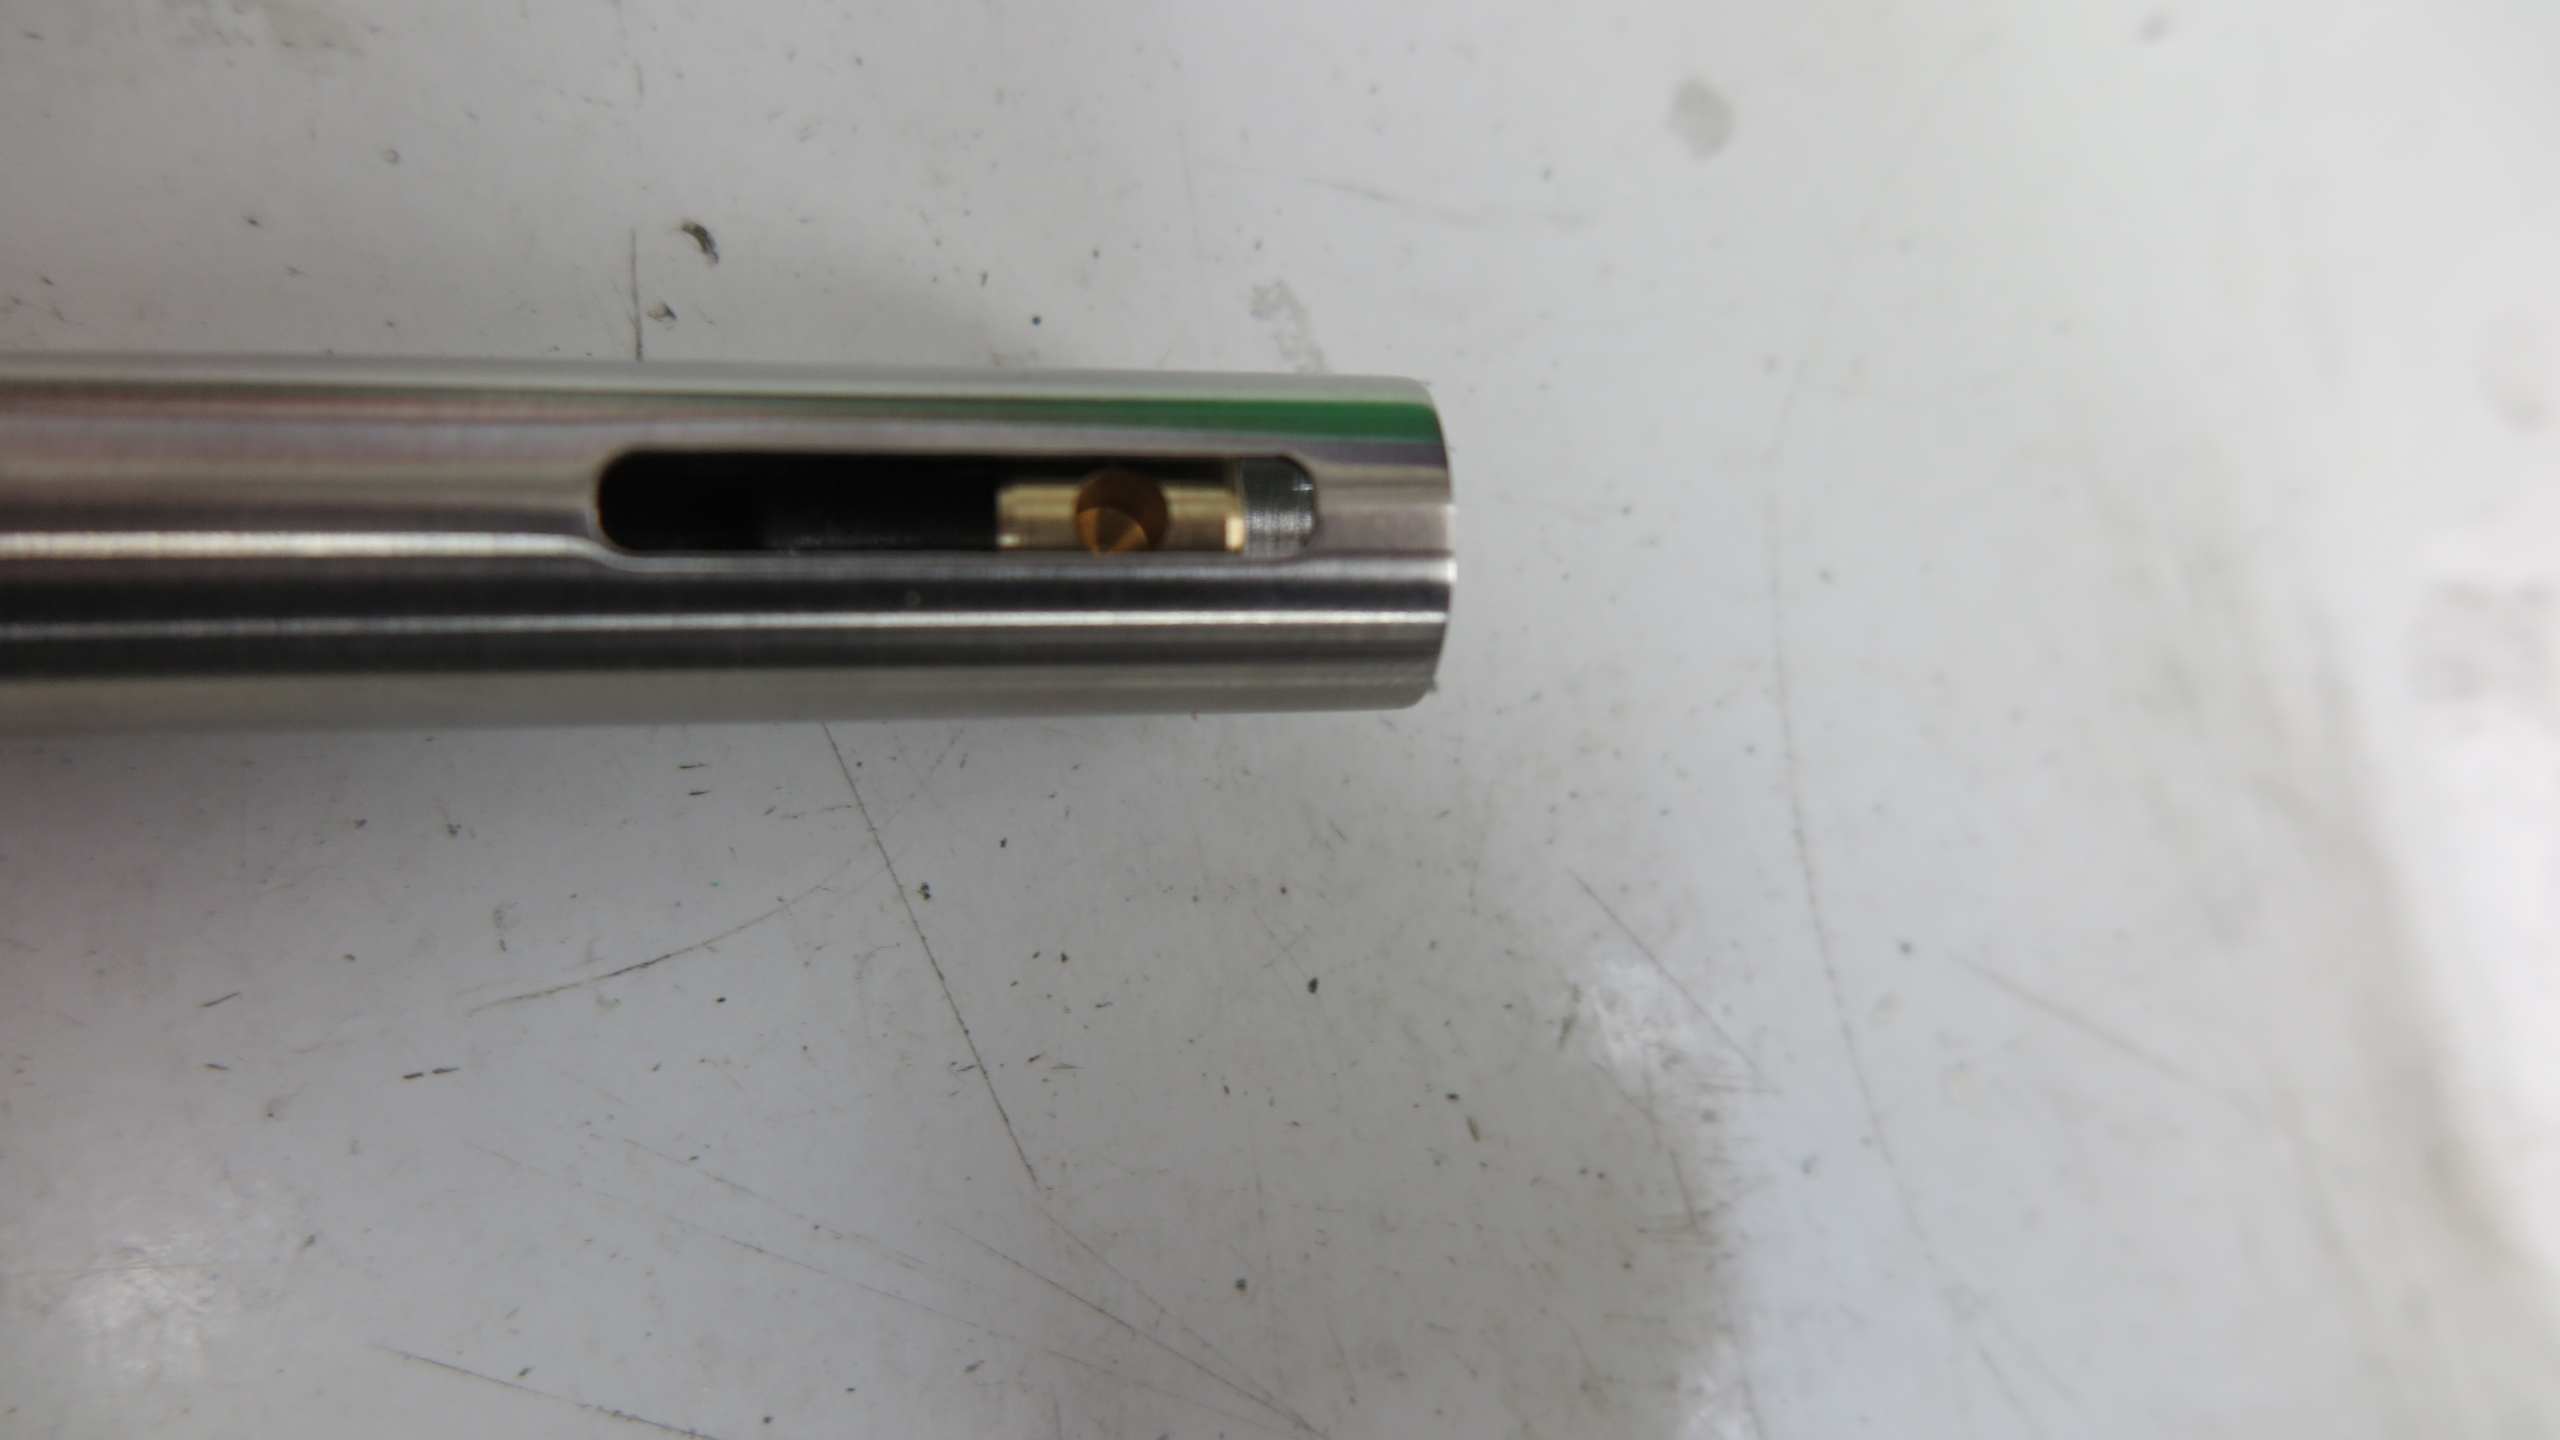
Now slide the old counter-weight off the end of the Rear Stub but take care that the brass cylinder insert inside the stub does not come out or get lost.
INSTALLING THE NEW COUNTERWEIGHT
Installing the new counterweight is a reversal of removing the old one. However you must take care to arrange the brass cylinder so that it’s hole lines up perfectly with the stub slot as shown in photo below. You then need to position the counterweight such that as you turn the Counterweight clamping screw clockwise, that it enters the hole in the brass insert.
Ensure that the clamping screw enters the hole of the brass insert. You can easily see if the bolt has located properly (once screwed in fully) as the brass insert will slide with the counterweight when you slide it along the rear stub.